
Learn very EASILY how to build your own reclaimed wood table!
Materials Needed:
– Spruce-Pine-Fur Lumbar 2x6x10ft (3 pieces, cut in half)
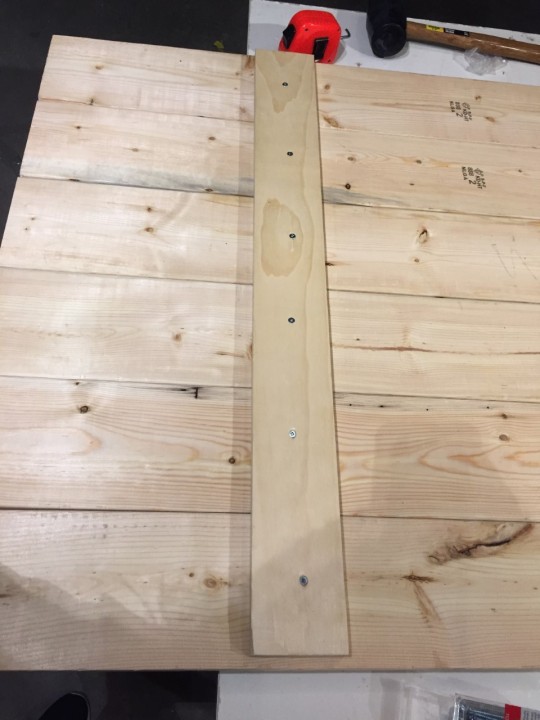
– Oak wood strips 1x4x8ft (1 piece cut into 3)
– Miniwax Wood Finish Stain (Provincial 211)
– Miniwax Fast Drying Polyurethane
– 2 IKEA Lerberg Trestle grey legs
– Zinc Wood Screws 8x 1 ¾
– 3” Flat utility brush for stain
– Old rags
Don’t be intimidated by these steps. If I can do this, I PROMISE you, you can too!
Step #1
Go to your local Home Depot, and look for the Spruce-Pine Fur Lumbar. You will need 3 pieces cut in half (they will do this for you at the store) Dimensions: 2x6x10ft. Try to find the pieces that are the least warped. Once pieces are cut you will have 6 equal pieces.
Step#2
When you get home, make sure you have an elevated surface to work on…this will make your life a lot easier. Lay down the 6 pieces of Spruce Pine Fur upside down alongside each other

Step#3
Grab the 3 pieces of Oak wood strips. You will be using these are your “braces” which will keep the table top together. Measure out 3 places for your braces. 1 at each end, and one in the middle. Take your Zinc Wood Screws, and screw/drill into the wood. (6 screws for each plank of wood) Do this for the next two braces. 18 zinc screws total for all the braces.
Step#4
Carefully flip the table top over so that the braces are now at the bottom. Now the not so fun, but necessary part! SANDING! We used the Ryobi hand sander. It’s small and really easy to use! So if you are a beginner sander like we were, pay attention to this part.
**Grits. What’s a Grit you ask? Good question… this refers to the rough surface that is going to smooth out the wood before you stain/paint it. SO, there are various grit intensities which range from 80-320. For this project we used 3 different levels. 80,150,220. (You buy these separately from the sander and it attaches to the bottom very easily.)
Start off with the 80 grit. Sand the entire surface, wipe off the dust and continue with the two other grit levels.

Step#5
The table top at this point should feel like a baby’s bum. SMOOTH. That was easy right? Now, get a damp cloth to wipe down anY left over dust that’s hanging around. Let this completely dry. Usually about 10-15 minutes.
Step#6
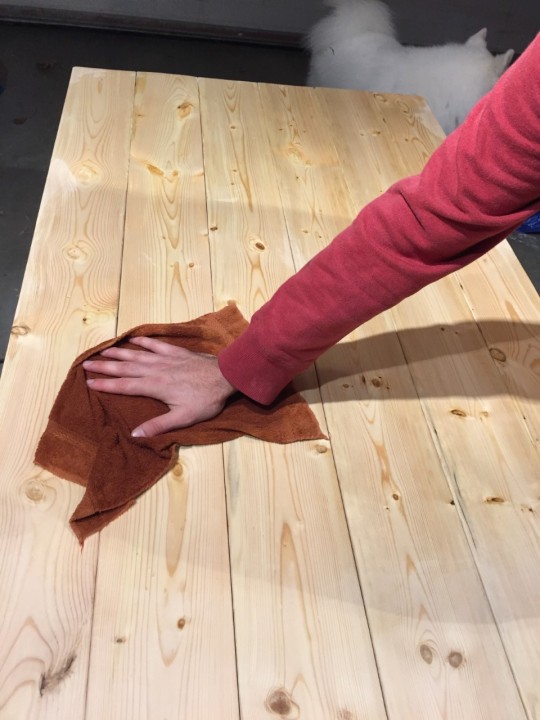
Staining! Grab your brush and stain. The colour we used was Provincial 211 (Minimax) Brush on the stain in the direction of the grain. In this case brushing the long way from side to side, not the width which is top to bottom. Let this sit for about 10 minutes. Get a cloth that you don’t care about, and wipe down the table top, again in the same direction as you painted. Let this sit for a few hours/next day. We only did one coat.


Step#7
Now the finishing touches to the table top. We are almost there! Now that the stain is nice and dry, grab the fast drying sealant (minimax fast drying polyurethane) Again, painting this on with a thin layer covering the entire table top. Let this dry for a couple hours, and re apply another layer. Let dry for 24 hours.

Step#8
Attaching the IKEA legs. SOOO this was the more difficult part of this project and it required some trial and error on our end, but lucky for you we figured out the simple way! After you assemble the two legs, you are going to match up the surface on top of the legs to one of the braces under the table. (Obviously the ones at the end, not the one in the middle) Once it is centred, grab your drill and screws. Picture this: you are lying under the table matching up the top of the legs to the brace which is on the bottom of the table top. Drill through the metal legs going through the bottom up. Do 2-4 holes depending on how it is holding. Repeat this on the other side. You may need to adjust the legs with your hands after to make it as sturdy as possible.


Step#9
ENJOY your new dining room table!!!

